Creating Blog Content
This guide walks you through creating blog posts in Prismic and using the product slices to embed live CardNexus data into your articles.
Creating a Blog Post
Open Prismic
Go to the Prismic dashboard and create a new Blog Post document.
Fill in the basics
| Field | What to enter |
|---|---|
| UID | The URL slug for your post (e.g. mtg-final-fantasy-guide). Keep it short, lowercase, and use hyphens. |
| Title | Your article headline. |
| Description | A short summary — this appears below the title and in search results. |
| Category | Select a blog category. Categories are used by the LatestBlogPostsByCategory slice on the Blog Index to group and filter posts — they don’t have their own listing pages. |
| Tags | Add relevant tags. Each tag creates a listing page (e.g. /blog/tag/[tag]) showing all posts with that tag. Useful for cross-cutting topics like “market analysis” or “deck tech”. |
| Games | Select which games this post relates to. Each game has its own listing page (e.g. /blog/game/[game]) showing all posts tagged with that game. |
| Author | Select the author (must be a Person document in Prismic). |
| Date | The publication date. |
| Image | Upload a hero image — this appears at the top of the post. |
Add your content
Use the Slice Zone to build the post body. You can mix and match:
- Content — Write rich text (paragraphs, headings, bold, links, lists)
- Image — Add a full-width image
- Video — Embed a video
- Quote — Add a blockquote
- ProductHighlight — Embed a single product card
- ProductCarousel — Embed a row of product cards
- Decklist — Embed a product list with card preview
Optional: Add a Push Card
The Push Card is a promotional banner that appears in the sidebar on desktop. Fill in:
- Background Image — The full artwork/background
- Foreground Image — A logo or text overlay (use a PNG with transparency)
- Link — Where the card links to when clicked
Leave all three empty if you don’t want a push card.
Save and publish
Save the document and publish when ready.
Finding Product IDs
Product slices need a Product ID to display live data. This is a long string like 507f1f77bcf86cd799439011.
How to find it:
- Go to the CardNexus website (staging or production)
- Navigate to the product you want via Explore
- Look at the URL — the product ID is the last part after the final hyphen
For example, in /explore/mtg/foundations/card/lightning-bolt-67abc123def456, the product ID is 67abc123def456.
Make sure to copy the full ID. If a product doesn’t display after publishing, double-check the ID is correct and the product exists.
Product Slices
ProductHighlight
Use this to showcase a single product with its full details.
Default variation
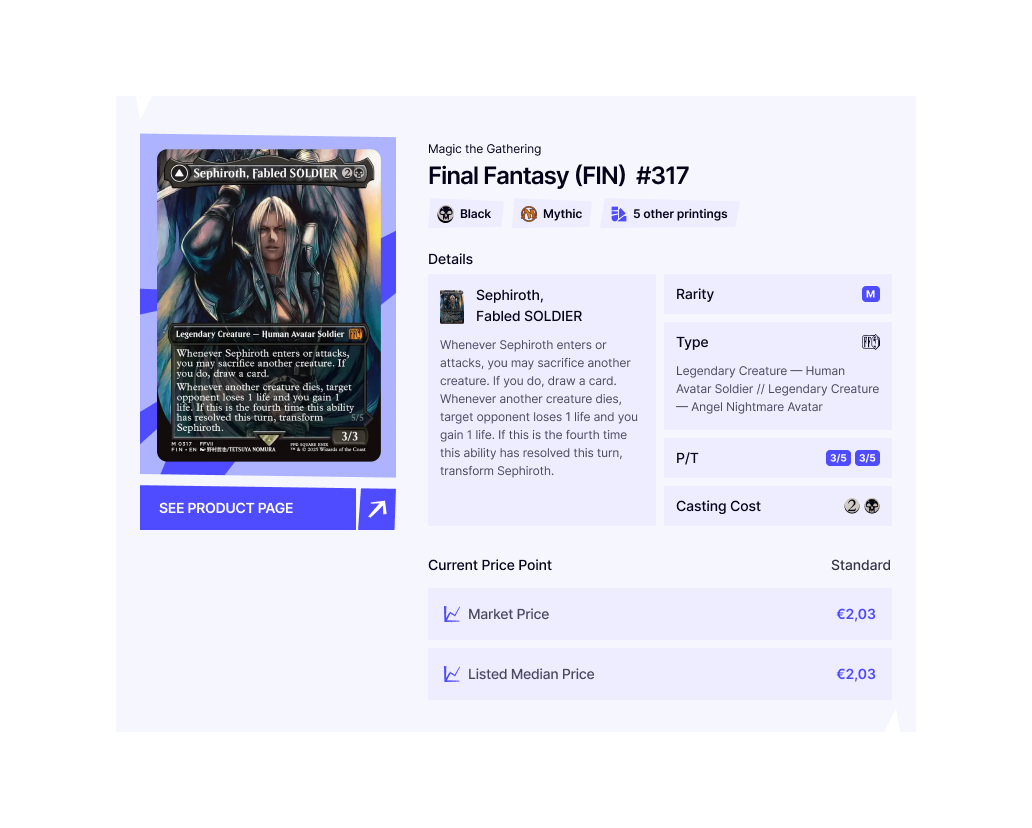
Shows the product card image, expansion name, card attributes, and market pricing. Great for featuring a specific card you’re discussing in the article.
Fields to fill in:
| Field | Required? | Description |
|---|---|---|
| Product ID | ✅ Yes | Paste the product ID |
| Caption | No | Optional text that appears below the card |
Graph variation
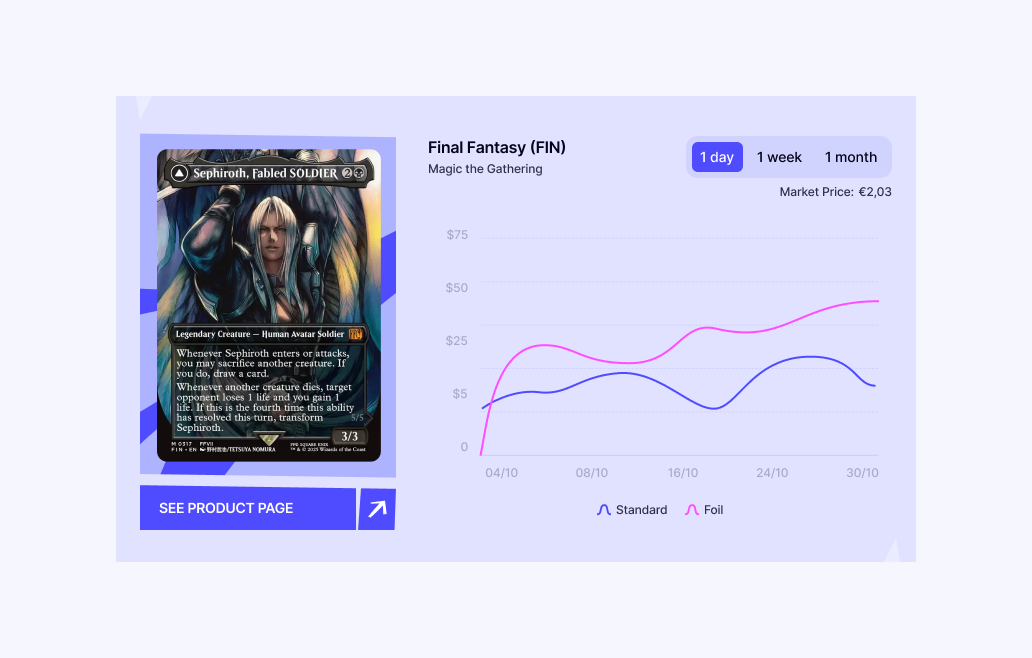
Shows the product card alongside a price history chart. Readers can toggle between 1 day, 1 week, and 1 month views. Use this when discussing price trends or market movements.
Fields to fill in:
Same as default — just the Product ID and an optional Caption. Select the Graph variation in the slice picker.
ProductCarousel
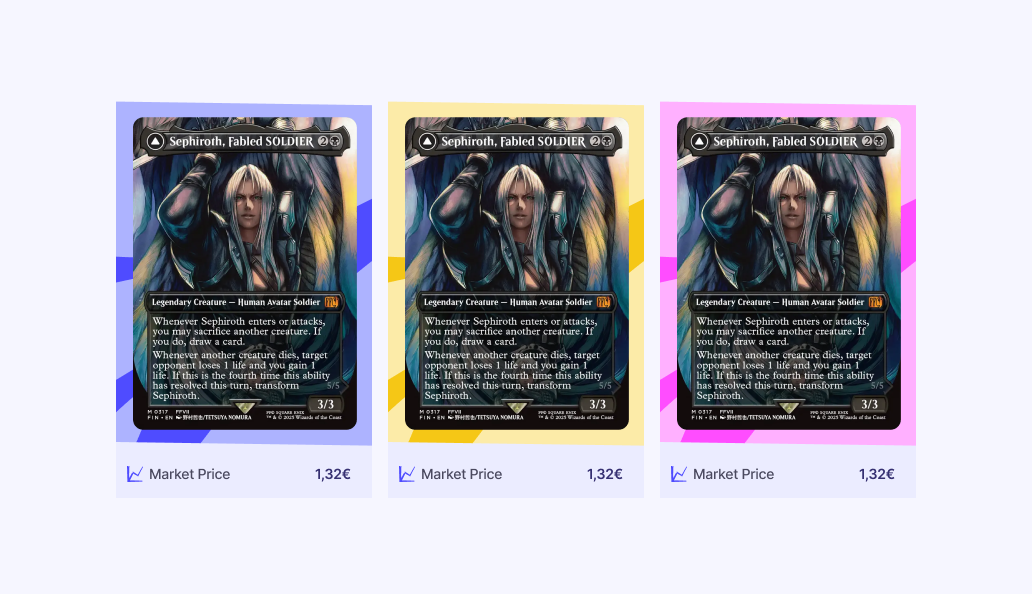
Use this to showcase multiple products in a horizontal scrollable carousel. Each card shows the product image, name, game, and market price.
Fields to fill in:
For each product in the carousel:
| Field | Required? | Description |
|---|---|---|
| Product ID | ✅ Yes | Paste the product ID |
| Background Colour | No | Choose blue, pink, or yellow for the card background. Defaults to blue. |
You can add as many products as you like. The carousel scrolls horizontally so readers can browse through them.
Decklist
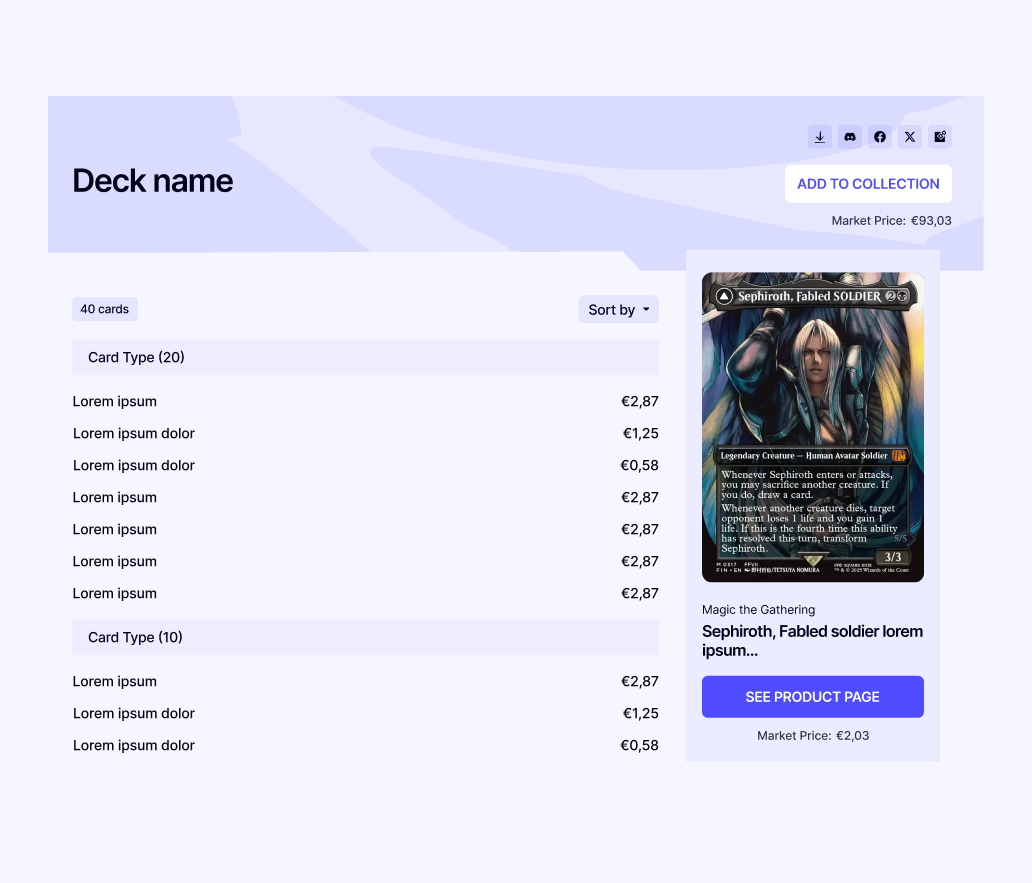
Use this to display a list of cards with quantities — perfect for deck guides, set reviews, or “top picks” articles. Includes a card image preview panel, sort options, and total market price.
Fields to fill in:
| Field | Required? | Description |
|---|---|---|
| Title | No | A heading for the decklist (e.g. “Mono Red Aggro”) |
For each product:
| Field | Required? | Description |
|---|---|---|
| Product ID | ✅ Yes | Paste the product ID |
| Quantity | No | Number of copies (defaults to 1) |
What readers see:
- A sortable list of cards with quantities and prices
- On desktop: hovering a card shows a preview image on the right
- Clicking any card takes them to the product page on CardNexus
- A total market price for the entire list
- Social share buttons to share the article
The order of products in Prismic is the default display order. Readers can re-sort by name or price using the dropdown, but “Sort by” resets to your original order.
Blog Index Page
The blog listing page (/blog) is also built in Prismic using the Blog Index document. This is a single (non-repeatable) document that controls what appears on the main blog landing page.
Available Slices
The Blog Index supports these slices:
| Slice | What it does |
|---|---|
| TextHero | A hero banner at the top of the page with a heading and optional description. Sets the tone for the blog landing. |
| FeaturedBlogPosts | Manually curated spotlight — pick up to 3 specific posts to feature prominently. Use this to promote important articles. |
| LatestBlogPosts | Automatically shows the most recent posts across all categories. Set the Number of Posts to control how many appear. |
| LatestBlogPostsByCategory | Shows the latest posts from a specific Category. Has two variations: Default (simple list) and Featured (larger cards). Set the category, title, CTA link, and number of posts. |
| LatestVideoBlogPosts | Automatically shows the latest posts that have video content attached. Set a title, CTA link, and number of posts. |
| TopicLinkList | A row of topic/tag links for quick navigation (e.g. “Market Analysis”, “Deck Guides”, “Set Reviews”). |
| GameLinkList | A list of game links that each go to a listing page showing all posts tagged with that game. |
How it all connects
The taxonomy fields on blog posts (Category, Tags, Games) serve different purposes:
- Categories → Used by the LatestBlogPostsByCategory slice to group posts on the Blog Index. No dedicated listing page.
- Tags → Each tag has a listing page at
/blog/tag/[tag-slug]showing all posts with that tag. - Games → Each game has a listing page at
/blog/game/[game-slug]showing all game-related posts.
The GameLinkList and TopicLinkList slices on the Blog Index provide navigation links to these game and tag listing pages.
When you assign a Tag or Game to a blog post, it automatically appears on the relevant listing page. No extra configuration needed.
Tips
- Mix slice types freely — You can have text, then a ProductHighlight, then more text, then a Decklist. They work in any order.
- Same product in multiple slices — If you reference the same product ID in a ProductHighlight and a Decklist, it only loads once. No performance concern.
- Product not showing? — Check the Product ID is correct. If the product doesn’t exist or has been removed, the slice will show a loading skeleton or be empty.
- Pricing is live — Product prices update automatically based on marketplace data. You don’t need to manually update prices in your content.